How to Disable Laptop Keyboard (Lock Laptop Keyboard)
How to Disable Laptop Keyboard is the most searched term by Laptop users. If you are also Searching for How to Lock Laptop Keyboard, then you are at right place. Today in this Article, I’m going to Share How to Disable Laptop Keyboard On Windows.

Nowadays, most of the people use Laptops instead of PC. Though there is inbuilt Keyboard in Laptops, people prefer using External Keyboard and Mouse.
If any liquid is spilled on Laptop Keyboard, it stops working. When you go for a repair, it will cost a huge amount from your pocket.
If some of the keys on your keyboard isn’t working, it becomes difficult to handle it. Also, if your Laptop keys are not working properly and any buttons are clicked automatically, it is very annoying and can also delete your files automatically.
Suppose you want to copy a file and you select a file, instead of copy, delete button gets automatically pressed which can delete your file or folder. Though there are many Methods to Recover File, still, in that case, you have to Disable your Laptop Keys.
There are many reasons to Disable Laptop Keyboard and some of them are as follow.
Also Read : How to Recover Unsaved Word Document
Reasons to Lock Laptop Keyboard:
- If you are not using Inbuilt Keyboard & Only use External Keyboard
- Some of the Keys are not working properly
- Buttons automatically get pressed on Keyboard
- Don’t use Laptop Keyboard
- Always use External Keyboard
These were few reasons to Lock or Disable Laptop Keyboard. If you have a non-working Laptop Keyboard, it is good to disable it.
There are many Methods on How to Disable Laptop Keyboard Permanently & How to Disable Laptop Keyboard Temporarily.
So, if you are looking to Disable Inbuilt Laptop Keyboard or How to Disable Laptop Keyboard when USB Plugged In, then this guide is for you. Here, I’m going to Share 2 Working Methods On How to Disable Laptop Keyboard Windows.
Also Read : How To Control PC From Android [ 5 Methods ]
How to Disable Laptop Keyboard (Lock Laptop Keyboard)
When it comes to Disable Inbuilt Windows Keyboard, there are many different methods for that but here I’m going to Share 2 easy and working methods to Lock Windows Laptop Keyboard. So, let’s proceed further and check out 2 Working Step by Step Guide on How to Disable Internal Laptop Keyboard.
Method 1: How to Disable Laptop Keyboard From Device Manager?
- Open Your Windows PC.
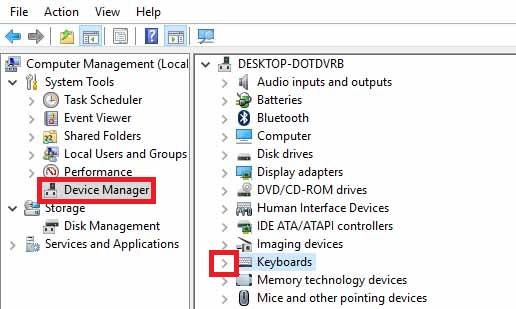
- Now, Press Windows Key & Search for Device Manager or Simply Right Click On This PC and then Click On Manage.

- After that, Click On Device Manager, then Click On Drop Down Arrow near Keyboard as shown below.
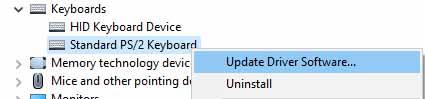
- Here, Right Click On the Keyboard as shown and then Click On Update Driver Software.
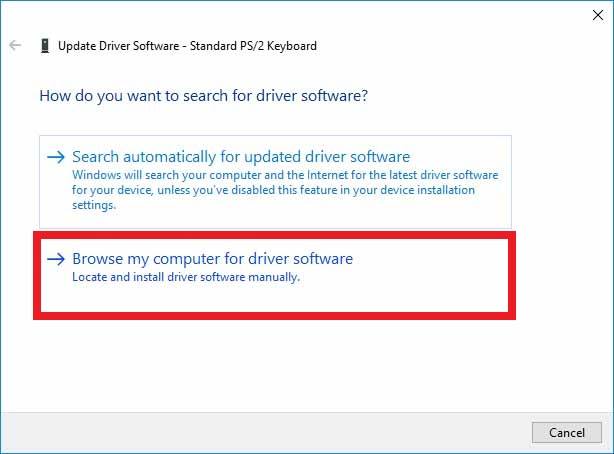
- Now, Click On Browse my computer for driver software.
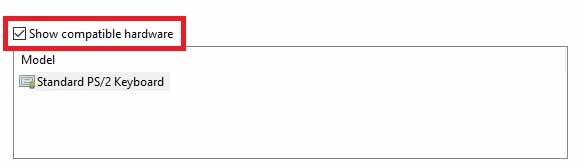
- Now, Click On Let me pick from a list of device drivers on my computer.

- On the next page, you can see “Show Compatible Hardware” Option. By Default, it is check, Simple Uncheck that option.
- Now, you can see the list of Manufacturer. Simply, Select any of the brands except your original one. Eg: I have an Acer Laptop, I will select any of the Manufacturer except Acer. In this case, I’ve selected Toshiba.

- After selecting the Manufacturer, Click On Next button.
- Now, it will show a Warning Message, Simply Click On Yes.
- Finally, you have to Restart your PC.
Done! With this simple method, you can easily Disable Keyboard On Laptop without any issue. Once Driver is successfully updated, you just have to Restart your PC to make changes.
Also Read : How to Direct Message On Instagram PC (2 Methods)
Video Guide On How to Lock Inbuilt Keyboard On Laptop
How to Enable Laptop Keyboard?
Once you have Disabled Laptop Keyboard using the above method, it will be Disabled until you Enable it. To Enable Windows Laptop Keyboard, follow the below steps.
- Go to Device Manager.
- Click On Drop Down arrow near your Keyboard.
- Now, Right click on the Keyboard & Update Driver Software.
- Here, Simply select “Search automatically for updated driver software”
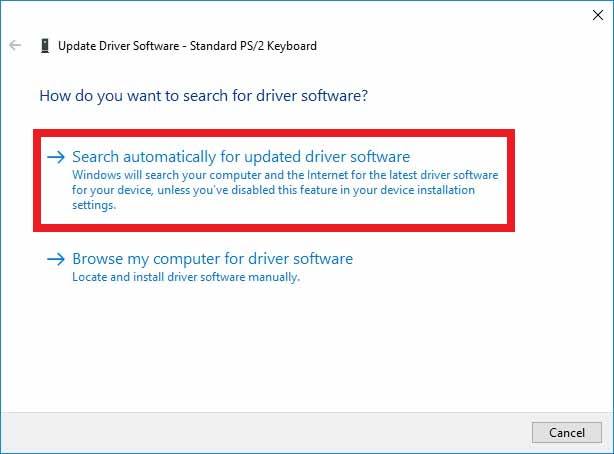
- Done! Your Laptop Keyboard is Activated.
Also Read : How To Stop Auto Download In WhatsApp
Method 2: How to Lock Laptop Keyboard Using Keyboard Keys?
- To Disable your Laptop Keyboard, Simply Hold Shift Button present below the Enter Key.
- Hold the Shift Key for around 8 seconds or until you hear a sound.
- Now you can see a Pop-up appeared on your Screen.

- Simply, Click On Yes.
Done! You have successfully Disable your Windows Laptop Keyboard. This is one of the Best method for Disabling Laptop Keyboard Temporarily. To Enable Laptop Keyboard, Again Hold the Shift Key for around 8 Seconds and the Keyboard will be enabled.
Also Read : 10 Best Planner App For Android 2018
Final Words
This was the Article On How to Turn Off Laptop Keyboard Temporarily or Permanently. Though there are other methods as well, here I’ve shared the Two Working & Best Method out of them. So, if you were searching for How to Disable Keyboard In Windows 10, hope you’ve got your answer.
Hope you liked this Article On How to Disable Laptop Keyboard. Do Comment below if you have any query. Stay tuned with us for more latest Tricks & Updates.

How To Get Free Google Play Credits [ 2 Methods ]

Hosting Your Own Gambling Website Using WordPress

How To Create Fake Last Seen On WhatsApp
About Author
Dheeraj Singh
Dheeraj Singh is the Founder & CEO of Trick Xpert, a Part-Time Blogger. He is here to provide information about Latest Technology, Tricks, Money Making Tricks & Blogging Tips.