How To Password Protect Excel File (3 Methods)
If you are looking to Password Protect an Excel File then you are at right place. Whether you use Microsoft Office Excel 2007, 2010 or 2013, this method works for all of them. So, today I’m going to Share How To Password Protect Excel File?
Nowadays, Data is Money. So, securing your data is very much important. Whether you work on any file, folder or Microsoft Office Products, you should always create a Password Protect Excel Worksheet.
If you are working with the team and sharing file on the internet, make sure to Add a Password in it so that it can be secured and can be unlocked only by your team members.
If you are working on a Windows PC or Mac, you might be using Excel Document. Microsoft Office Excel is used by everyone, whether it’s a school, college or business. So, it’s very important to Lock Excel Sheet for security reasons.
The Best way to Secure your Excel Data is by using its inbuilt Password Protect Feature. But, before you use Excel Inbuilt Lock Feature, here are few things to remember.
Things to Remember while Password Protecting an Excel File
- If you forgot or lost your password, you cannot Recover Document File. Though you can use third-party Recovery Software, it cannot be recovered by Excel as it doesn’t have Password Recovery Option.
- Anyone having access to the password to modify can remove the password protection and modify the Excel Document Password.
- Though password cannot be cracked easily, still, there are many tools for that. So, it is recommended to use a strong password and double layer of password like using third-party App Lock Software to lock the folder.
Also Read : How To Enable Blue Light Filter Windows 10
How To Password Protect Excel File (3 Methods)
Method 1: How To Password Protect Excel File In Excel 2010?
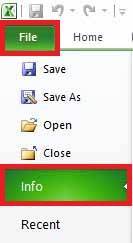
- Open Excel Document you wanna Set Password to.
- From Top Left Corner, Click On File then Click On Info.
- Now, Under Permissions, Click On Encrypt with password.
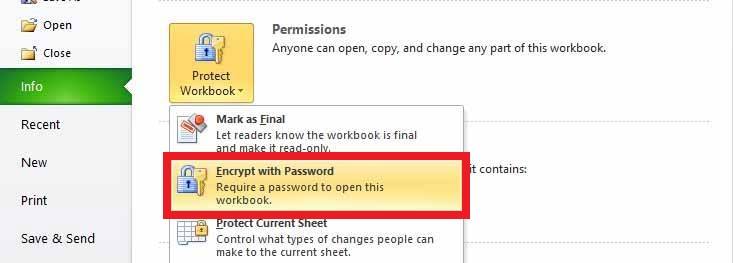
- Here, Enter the password you want to set for Excel Document.
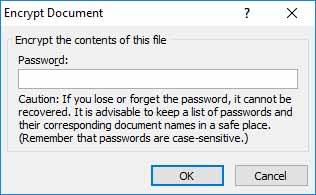
- After entering your password, Click on OK and again enter your password to confirm. Now, you have Password Protected Excel File Without Software.

- Finally, Save your Excel Document.
Done! With this few simple steps, you can easily put Password on Excel file to Password Protect Excel 2010. You can use this same method to Password Protect Excel 2013.
Video Guide On How to Setup Password On Microsoft Excel 2007, 2010 & 2013
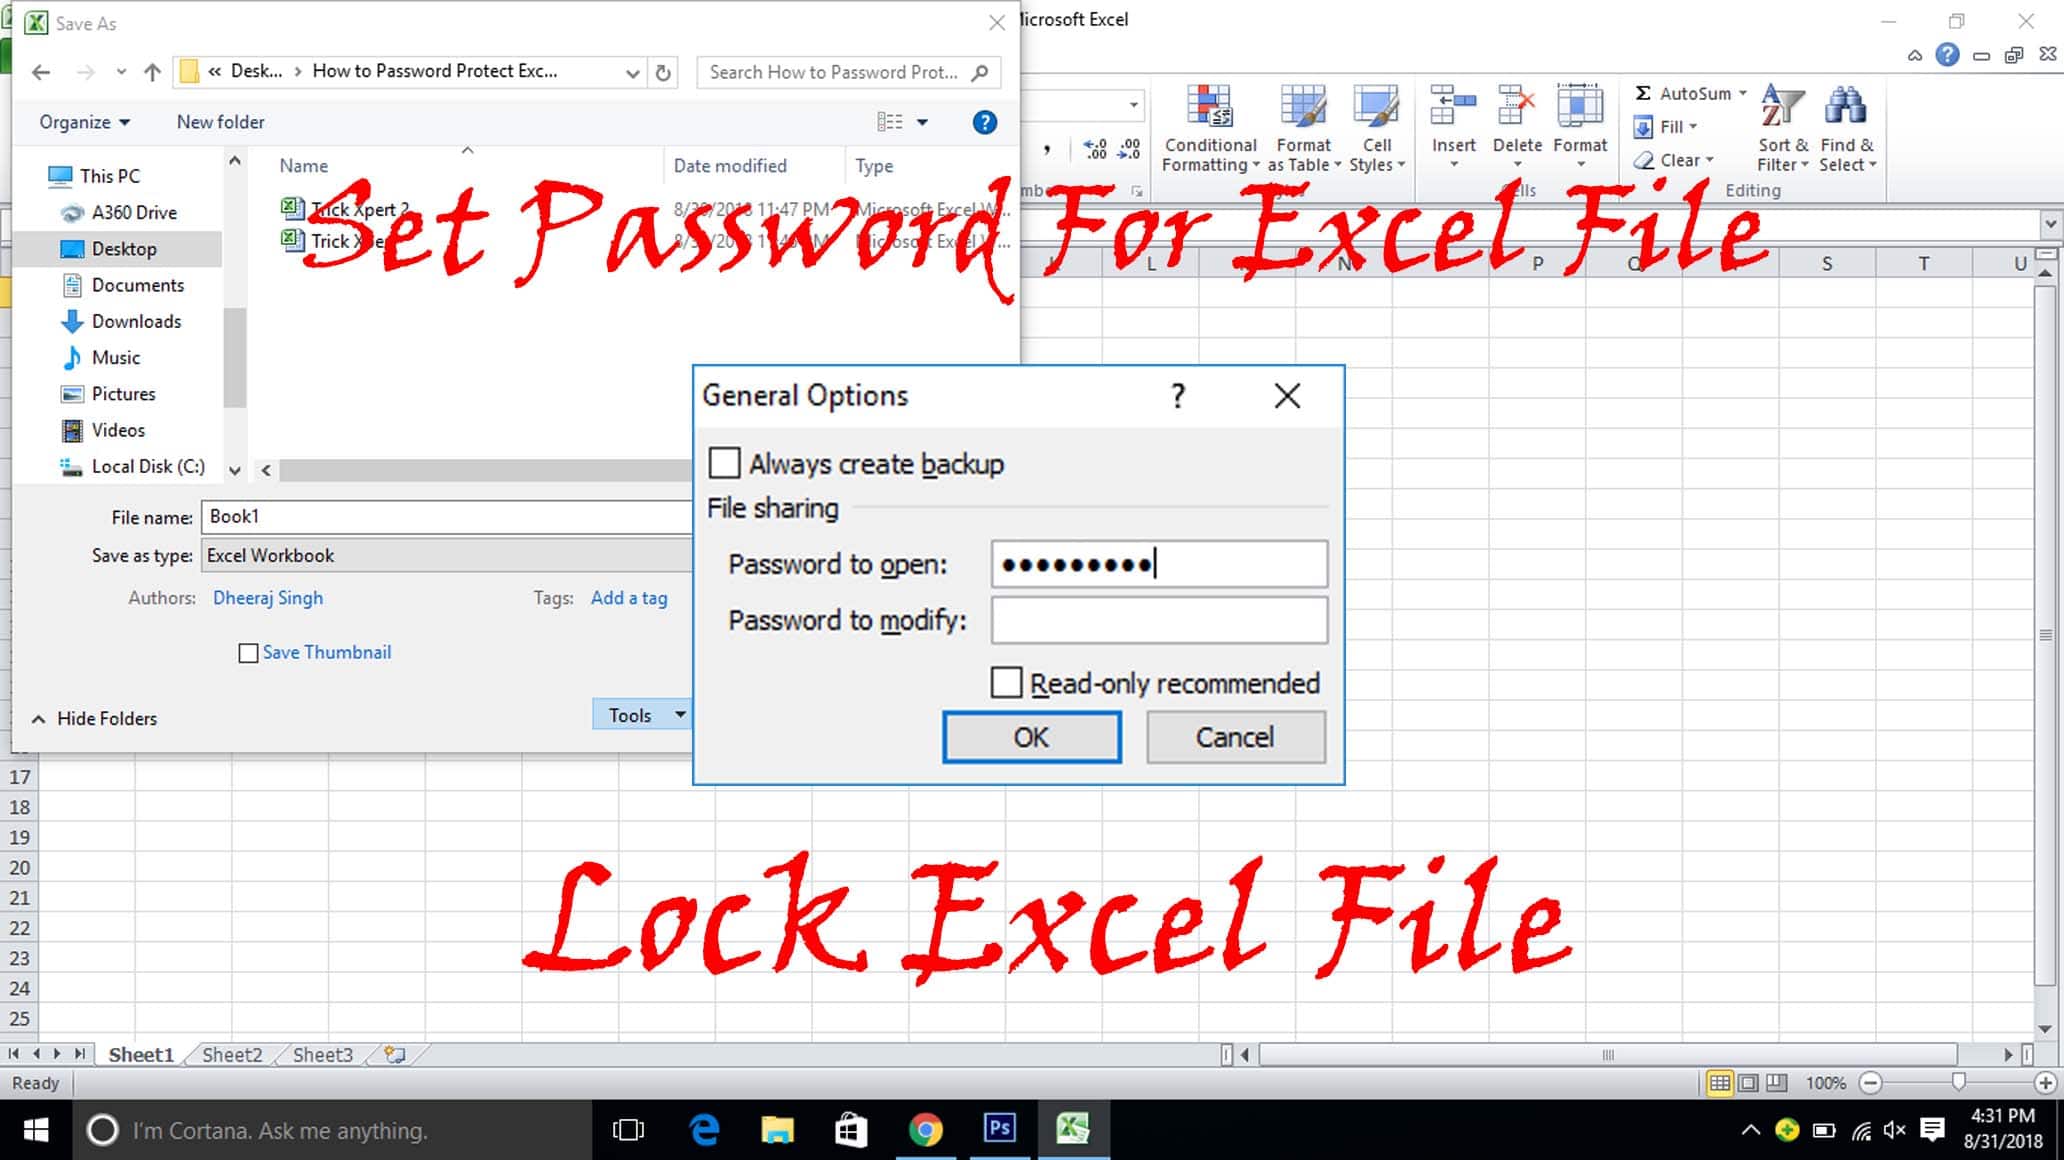
Method 2: How To Protect Excel File With Password In Excel 2007 Without Software?
- Open Excel Document you want to Lock.
- From Top Left Corner, Click on File then Save As.
- Click on Tools Dropdown Option and then select General Options.

- Here, you can set two passwords; one to open the workbook and another to modify the workbook.
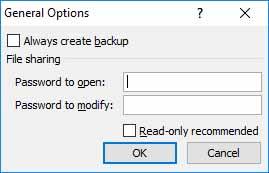
- Enter one or both the passwords and click on OK.
- Now, Renter your passwords and click on OK.
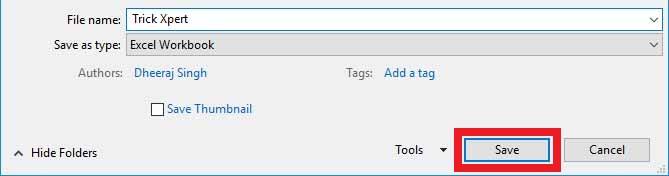
- Finally, Enter the File Name & Click on Save.
Done! With this simple steps, you can easily Password Protect Excel File 2007. Once you locked the document, you can only access it via password. This method can also be used in Microsoft Office 2010 & 2013.
Also Read : How to Disable Laptop Keyboard (Lock Laptop Keyboard)
Method 3: How To Put Password In Excel Using Third-Party Software?
With the above 2 methods, you can easily lock excel document without any hassle. But, if you don’t want to use those methods, you can try out this method.
Also, if you have a sensitive data, then you can use this method to double lock your Excel File. First, use the above method and then use this method to double protect your Excel File.
When it comes to Lock Folder or File, there are many tools and Password Locking Software available on the internet. You can use any of them to lock your file and folder.
Here, I’m going to use Winrar to Set Password On Excel File. You can follow the step by step guide from below to Password Protect Excel File With Software.
- Firstly, Download Winrar Software From Here: Download
- After Downloading, Install the Software.
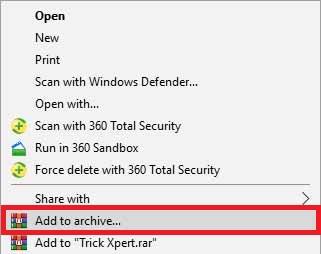
- Now, Right Click On the Excel File you want to Lock with Password & Click On Add to archive.
- Here, Click On Set Password.
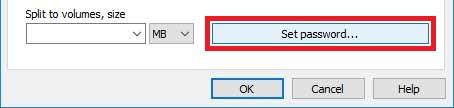
- Now, Enter the Password you want to set and again type the same password for verification.
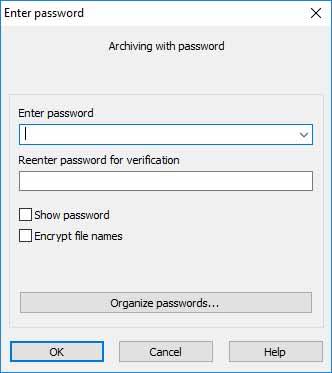
- Finally, Click On OK.
Done! Your File has been password protected. You can use this method to Double Protect your Excel File. Though there are many Methods to Remove Password From RAR File, still double protecting your Excel File is very important for sensitive data.
Also Read : How to Direct Message On Instagram PC (2 Methods)
Final Words
This was the Article On How To Password Protect Excel Document. Here, I’ve shared the 3 Working Methods on How to Password Protect a File In Excel. Apart from this, there are many other File Locking Softwares and Tools which you can use but here I’ve shared the Best Methods out of them.
While using Inbuilt Lock Feature in Excel, make sure you don’t forget your password as you cannot recover it again. Though there are many tools available in the market to Remove Password From Excel File, still I’ll recommend taking note of your password.
So, if you were searching for How Do I Password Protect an Excel Spreadsheet, hope you’ve got your answer. Hope you liked this Article On How to Password Protect Excel File. Comment below if you have any query. Stay tuned with us for more latest Tricks & Updates.

How To Convert MKV To MP4 Format [ 3 Methods ]

How To Take Screenshot In iPhone X [ 2 Methods ]

How To Create Fake Last Seen On WhatsApp
About Author
Dheeraj Singh
Dheeraj Singh is the Founder & CEO of Trick Xpert, a Part-Time Blogger. He is here to provide information about Latest Technology, Tricks, Money Making Tricks & Blogging Tips.